Xamarin FormsアプリにAdMobの広告を表示する
初稿:
更新:
本記事の概要
個人的な趣味でスマホアプリ開発をしている。
開発人口の少ない「Xamarin Forms」による超貧弱弱小アプリではあるが、一丁前にGoogleの「Admob」を使用した広告表示もしている。
アラフォー初心者だけどスマホアプリを開発~リリースまでがんばってみた【Android・Xamarin.Forms】
この度、素人ながらスマホアプリ開発に挑戦してみました。今回の記事では概要と経緯について書き綴ってみたいと思います。実際に行った作業の詳細は、今後それぞれ記事を書き、こちらにリンクを追記します。作ったアプリ「OneThird」の概要 毎日の睡眠を入力によって記録するアプリです。寝た時間、起きた時間
今年2021年の初めにアプリをリリースした時点では、「Google Mobile Ads SDK」のバージョンが19→20への過渡期だった。
この時点ではバージョン19を使用した情報が得られたので、こちらのブログを参考に実装した。
AdMob In Xamarin.Forms – Display Google Ads In Your Mobile App – Xamarin Help
AdMob is a company that provided the ability to display ads in your mobile app. It is now a part of Google, and hence you may hear it referred as Firebase Ads or Google Mobile Ads. You can use this on iOS or Android. No other platform is currently supported at the time of this post.
そして現在、狭いXamarin Formsの界隈にもバージョン20に対応した情報が出始めたのをキッカケに対応するとした。
この19→20において何が問題かというと結構な箇所で互換性が無くなることだ。
私は「バナー広告」と「Interstitial広告」を使用しているが、後者の「Interstitial広告」において丸っとコードを書き換える必要が生じる。
そこであれこれ調べていたところ、Marco氏という方が作成した「MtAdmob plugin for Xamarin(以降、「MarcTron.Admob」と表記)」なるものを見つけた。
marcojak/MTAdmob: Admob plugin for Xamarin Android and iOS
Admob plugin for Xamarin Android and iOS. Contribute to marcojak/MTAdmob development by creating an account on GitHub.
ソースを見てみると実態としては「Xamarin.GooglePlayServices.Ads.Lite」と「Xamarin.Google.iOS.MobileAds」のラッパーであり、もちろん、それぞれ最新のバージョン(120.3.0.1と7.66.0)に対応している。
nugetパッケージで配布されており、導入および実装が非常に簡単なのが特徴。
以前に実装した方法ではカスタムレンダラーを作成したり実装に手間がかかったが、MarcTron.Admobでは各Platformに最低限の設定は必要なものの、ViewやViewModelにコードを書くだけでよい。
日本語の情報が見当たらなかったのでテスト広告を表示するサンプルを公開してみたい、というのが本記事の主旨。
本記事ではバナー広告とInterstitial広告を対象にしているが、MarcTron.Admobはリワード広告にも対応している。
iOSの開発環境がないためコードを掲載するがデバッグは行っていない点にご留意いただきたい。
開発環境
言語
- C#
フレームワーク
- Xamarin Forms 5.0
プラグイン
- Prism 8.1(MVVM開発用)
- MarcTron.Admob 1.6.7(MtAdmob plugin for Xamarin)
IDE
- Visual Studio 2019 Community
手順
新規プロジェクト(AdmobTestとした)を作成する。
ちなみにプロジェクト作成にはPrismテンプレートを使用している。
Nugetパッケージのインストール
PCLおよび各Platformプロジェクト(Android、iOS)にNugetパッケージ「MarcTron.Admob」をインストールする。
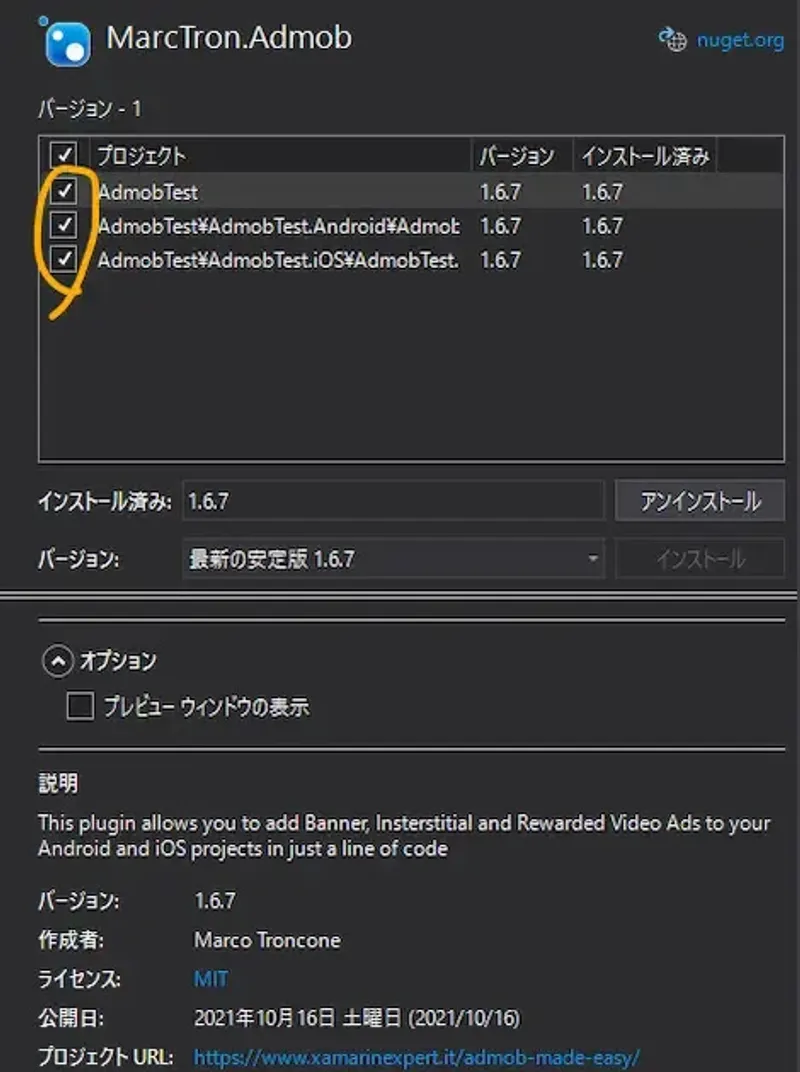
readme.txtが表示されるのでDeepL翻訳にでも放り込んで一読するとよいかも。
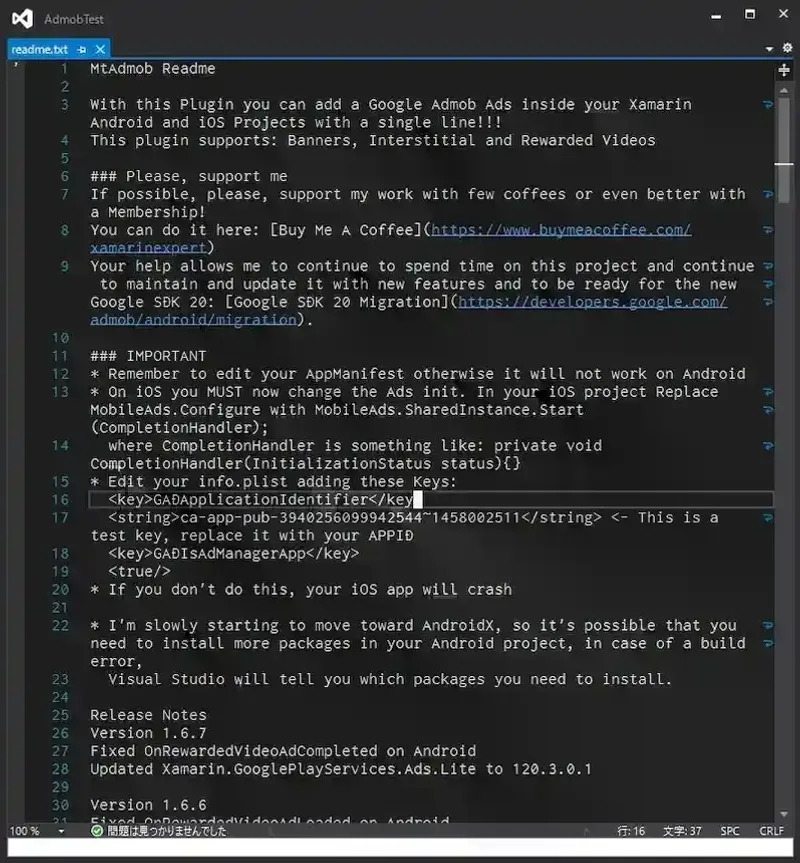
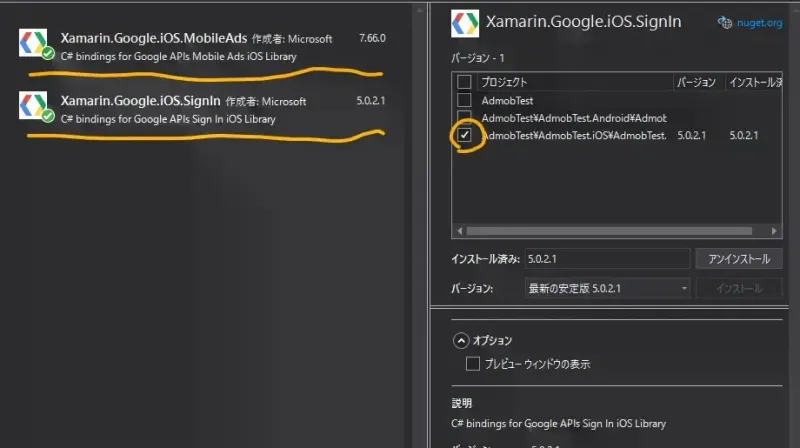
iOSプロジェクトに「Xamarin.Google.iOS.MobileAds」と「Xamarin.Google.iOS.SignIn」の2つのNugetパッケージをインストールする。
iOSの方は確認できていないが、
Marc氏のブログにこれらを入れないとアプリがクラッシュすると記載があった。
Androidプロジェクトの設定作業
テスト広告に使用するユニットIDは、公式に公開されているものを使用する。
AndroidManifest.xml
AndroidプロジェクトのProperties配下のAndroidManifest.xmlに下記を追加する。
<meta-data android:name="com.google.android.gms.ads.APPLICATION_ID" android:value="ca-app-pub-3940256099942544~3419835294" />
<meta-data android:name="com.google.android.gms.version" android:value="@integer/google_play_services_version"/>
<activity android:name="com.google.android.gms.ads.AdActivity" android:configChanges="keyboard|keyboardHidden|orientation|screenLayout|uiMode|screenSize|smallestScreenSize" android:theme="@android:style/Theme.Translucent" /><uses-permission android:name="android.permission.INTERNET" />
<uses-permission android:name="android.permission.ACCESS_NETWORK_STATE" />完成したAndroidManifest.xmlはこんな感じ。
<?xml version="1.0" encoding="utf-8"?>
<manifest xmlns:android="http://schemas.android.com/apk/res/android" android:versionCode="1" android:versionName="1.0" package="com.companyname.appname">
<uses-sdk android:minSdkVersion="21" android:targetSdkVersion="29" />
<application android:label="@string/app_name" android:icon="@mipmap/icon">
<meta-data android:name="com.google.android.gms.ads.APPLICATION_ID" android:value="ca-app-pub-3940256099942544~3419835294" />
<meta-data android:name="com.google.android.gms.version" android:value="@integer/google_play_services_version"/>
<activity android:name="com.google.android.gms.ads.AdActivity" android:configChanges="keyboard|keyboardHidden|orientation|screenLayout|uiMode|screenSize|smallestScreenSize" android:theme="@android:style/Theme.Translucent" />
</application>
<uses-permission android:name="android.permission.INTERNET" />
<uses-permission android:name="android.permission.ACCESS_NETWORK_STATE" />
</manifest>MainActivity.cs
OnCreateメソッドに下記1行を追加する。
MobileAds.Initialize(ApplicationContext);完成したMainActivity.csはこんな感じ。
using Android.App;
using Android.Content.PM;
using Android.Gms.Ads;
using Android.OS;
using Prism;
using Prism.Ioc;

namespace AdmobTest.Droid
{
    [Activity(Theme = "@style/MainTheme",
              ConfigurationChanges = ConfigChanges.ScreenSize | ConfigChanges.Orientation | ConfigChanges.UiMode | ConfigChanges.ScreenLayout | ConfigChanges.SmallestScreenSize)]
    public class MainActivity : global::Xamarin.Forms.Platform.Android.FormsAppCompatActivity
    {
        protected override void OnCreate(Bundle savedInstanceState)
        {
            TabLayoutResource = Resource.Layout.Tabbar;
            ToolbarResource = Resource.Layout.Toolbar;

            base.OnCreate(savedInstanceState);

            global::Xamarin.Forms.Forms.Init(this, savedInstanceState);

            MobileAds.Initialize(ApplicationContext);

            LoadApplication(new App(new AndroidInitializer()));
        }

        public override void OnRequestPermissionsResult(int requestCode, string[] permissions, Android.Content.PM.Permission[] grantResults)
        {
            Xamarin.Essentials.Platform.OnRequestPermissionsResult(requestCode, permissions, grantResults);

            base.OnRequestPermissionsResult(requestCode, permissions, grantResults);
        }
    }

    public class AndroidInitializer : IPlatformInitializer
    {
        public void RegisterTypes(IContainerRegistry containerRegistry)
        {
            // Register any platform specific implementations
        }
    }
}
Androidプロジェクトでの作業は以上。
iOSプロジェクトの設定作業
テスト広告に使用するユニットIDは、公式に公開されているものを使用する。
info.plist
下記4行を追加する。
<key>GADApplicationIdentifier</key>
<string>ca-app-pub-3940256099942544~5662855259</string>
<key>GADIsAdManagerApp</key>
<true/>
完成したinfo.plistはこんな感じ。
<?xml version="1.0" encoding="UTF-8"?>
<!DOCTYPE plist PUBLIC "-//Apple//DTD PLIST 1.0//EN" "http://www.apple.com/DTDs/PropertyList-1.0.dtd">
<plist version="1.0">
  <dict>
    <key>UIDeviceFamily</key>
    <array>
      <integer>1</integer>
      <integer>2</integer>
    </array>
    <key>UISupportedInterfaceOrientations</key>
    <array>
      <string>UIInterfaceOrientationPortrait</string>
      <string>UIInterfaceOrientationLandscapeLeft</string>
      <string>UIInterfaceOrientationLandscapeRight</string>
    </array>
    <key>UISupportedInterfaceOrientations~ipad</key>
    <array>
      <string>UIInterfaceOrientationPortrait</string>
      <string>UIInterfaceOrientationPortraitUpsideDown</string>
      <string>UIInterfaceOrientationLandscapeLeft</string>
      <string>UIInterfaceOrientationLandscapeRight</string>
    </array>
    <key>MinimumOSVersion</key>
    <string>10.0</string>
    <key>UILaunchStoryboardName</key>
    <string>LaunchScreen</string>
    <key>XSAppIconAssets</key>
    <string>Assets.xcassets/AppIcon.appiconset</string>
    <key>CFBundleDisplayName</key>
    <string>AdmobTest</string>
    <key>CFBundleName</key>
    <string>AdmobTest</string>
    <key>CFBundleIdentifier</key>
    <string>com.companyname.appname</string>
    <key>CFBundleVersion</key>
    <string>1.0</string>
    <key>CFBundleShortVersionString</key>
    <string>1</string>
    <key>GADApplicationIdentifier</key>
    <string>ca-app-pub-3940256099942544~5662855259</string>
    <key>GADIsAdManagerApp</key>
    <true/>
  </dict>
</plist>
AppDelegate.cs
FinishedLaunchingメソッドに、以下1行を追加する。
MobileAds.SharedInstance.Start(CompletionHandler);クラス内に以下メソッドを追加する。
private void CompletionHandler(InitializationStatus status){}完成したAppDelegate.csはこんな感じ。
using Foundation;
using Google.MobileAds;
using Prism;
using Prism.Ioc;
using UIKit;

namespace AdmobTest.iOS
{
    // The UIApplicationDelegate for the application. This class is responsible for launching the
    // User Interface of the application, as well as listening (and optionally responding) to
    // application events from iOS.
    [Register("AppDelegate")]
    public partial class AppDelegate : global::Xamarin.Forms.Platform.iOS.FormsApplicationDelegate
    {
        //
        // This method is invoked when the application has loaded and is ready to run. In this
        // method you should instantiate the window, load the UI into it and then make the window
        // visible.
        //
        // You have 17 seconds to return from this method, or iOS will terminate your application.
        //
        public override bool FinishedLaunching(UIApplication app, NSDictionary options)
        {
            global::Xamarin.Forms.Forms.Init();

            MobileAds.SharedInstance.Start(CompletionHandler);

            LoadApplication(new App(new iOSInitializer()));

            return base.FinishedLaunching(app, options);
        }

        private void CompletionHandler(InitializationStatus status) { }
    }

    public class iOSInitializer : IPlatformInitializer
    {
        public void RegisterTypes(IContainerRegistry containerRegistry)
        {
            // Register any platform specific implementations
        }
    }
}
iOSプロジェクトの作業は以上。
共通(PCL)プロジェクトの作業
共通プロジェクトでの作業は広告表示の実装となる。
MainPage.xaml
まずはViewから。
ヘッダに下記1行を追加する。
xmlns:controls="clr-namespace:MarcTron.Plugin.Controls;assembly=Plugin.MtAdmob"レイアウトとしては、まずInterstitial広告のロード状況を示すラベル、画面中央にInterstitial広告のロードボタン・ロードチェックボタン・表示ボタン、画面下部にバナーを設置する。
完成したMainPage.xamlはこんな感じ。
<?xml version="1.0" encoding="utf-8" ?>
<ContentPage xmlns="http://xamarin.com/schemas/2014/forms"
  xmlns:x="http://schemas.microsoft.com/winfx/2009/xaml"
  xmlns:controls="clr-namespace:MarcTron.Plugin.Controls;assembly=Plugin.MtAdmob"
  x:Class="AdmobTest.Views.MainPage"
  Title="{Binding Title}">

    <StackLayout Orientation="Vertical" Spacing="0">

        <StackLayout.Margin>
            <OnPlatform x:TypeArguments="Thickness">
              <On Platform="iOS" Value="0,20,0,0" />
              <On Platform="Android" Value="0,0,0,0" />
            </OnPlatform>
        </StackLayout.Margin>

        <Label
            Text="{Binding IsLoaded, StringFormat=ロード状況:{0}}"
            FontSize="Large"
            HorizontalTextAlignment="Center"
            VerticalTextAlignment="Center"
            HeightRequest="200" />

        <Button
            Text="Interstitial広告をロード"
            Command="{Binding LoadCommand}"
            HeightRequest="50" />

        <Button
            Text="Interstitial広告のロード状況を確認"
            Command="{Binding IsLoadedCheckCommand}"
            HeightRequest="50" />

        <Button
            Text="Interstitial広告を表示"
            Command="{Binding ShowCommand}"
            HeightRequest="50"/>

        <!-- Place the Admob controls here -->
        <controls:MTAdView
            IsVisible="true"
            AdsId="{OnPlatform Android='ca-app-pub-3940256099942544/6300978111', iOS='ca-app-pub-3940256099942544/2934735716'}"
            VerticalOptions="EndAndExpand"
            HorizontalOptions="FillAndExpand">
            <controls:MTAdView.HeightRequest>
                <x:OnIdiom>
                    <x:OnIdiom.Phone>60</x:OnIdiom.Phone>
                    <x:OnIdiom.Tablet>90</x:OnIdiom.Tablet>
                    <x:OnIdiom.Desktop>90</x:OnIdiom.Desktop>
                </x:OnIdiom>
            </controls:MTAdView.HeightRequest>
        </controls:MTAdView>

    </StackLayout>

</ContentPage>
MainPageViewModel.cs
続いてViewModel。
各処理についてはコメントを付けているのでコード内を参照されたし。
完成したMainPageViewModel.csはこんな感じ。
using MarcTron.Plugin;
using Prism.Commands;
using Prism.Navigation;
using Xamarin.Forms;

namespace AdmobTest.ViewModels
{
    public class MainPageViewModel : ViewModelBase
    {
        private string _isLoaded;
        private readonly string interstitialUnitId;

        public MainPageViewModel(INavigationService navigationService)
            : base(navigationService)
        {
            Title = "Main Page";

            // 各ボタンのDelegateCommandにメソッドを割り当て

            ShowCommand = new DelegateCommand(Show);

            LoadCommand = new DelegateCommand(Load);

            IsLoadedCheckCommand = new DelegateCommand(IsLoadedCheck);

            // Interstitial広告のロード状況を示すラベル用プロパティを初期化
            _isLoaded = CrossMTAdmob.Current.IsInterstitialLoaded().ToString();

            // Interstitial広告用 対象プラットフォームのUnitIDを設定
            switch (Device.RuntimePlatform)
            {
                case Device.Android:
                    interstitialUnitId = "ca-app-pub-3940256099942544/8691691433";
                    break;
                case Device.iOS:
                    interstitialUnitId = "ca-app-pub-3940256099942544/5135589807";
                    break;
            }
        }

        public DelegateCommand ShowCommand { get; private set; }

        public DelegateCommand LoadCommand { get; private set; }

        public DelegateCommand IsLoadedCheckCommand { get; private set; }

        // Interstitial広告のロード状況を示すラベルのプロパティ
        public string IsLoaded
        {
            get { return _isLoaded; }
            set { SetProperty(ref _isLoaded, value); }
        }

        // Interstitial広告の表示メソッド
        private void Show()
        {
            if (CrossMTAdmob.Current.IsInterstitialLoaded())
            {
                CrossMTAdmob.Current.ShowInterstitial();
            }
        }

        // Interstitial広告をロードするメソッド
        private void Load()
        {
            CrossMTAdmob.Current.LoadInterstitial(interstitialUnitId);
        }

        // Interstitial広告のロード状況をチェックするメソッド
        private void IsLoadedCheck()
        {
            IsLoaded = CrossMTAdmob.Current.IsInterstitialLoaded().ToString();
        }
    }
}
アプリで app-ads.txt ファイルを設定している場合
すでに公開済みのアプリでapp-ads.txtをGoogle Play Consoleに設定している場合は注意が必要。(私はこれでハマった)
Admob側がapp-ads.txtを参照するので、テスト広告を表示するには以下をapp-ads.txtに追加しておく必要がある。
google.com, pub-3940256099942544, DIRECT, f08c47fec0942fa0※参考:テスト広告を有効にする - Google Admob
実際の動作プレビュー(Android)
操作は下記の通り
- 「Interstitial広告をロード」ボタンをタップするとロード処理が行われる。
- 「Interstitial広告のロード状況を確認」ボタンをタップすると、ロード状況が上部ラベルに表示される。
- 「Interstitial広告を表示」ボタンをタップするとInterstitial広告が表示される。ただし、ロードされていない場合は表示されない。
実際の画面はこんな感じ
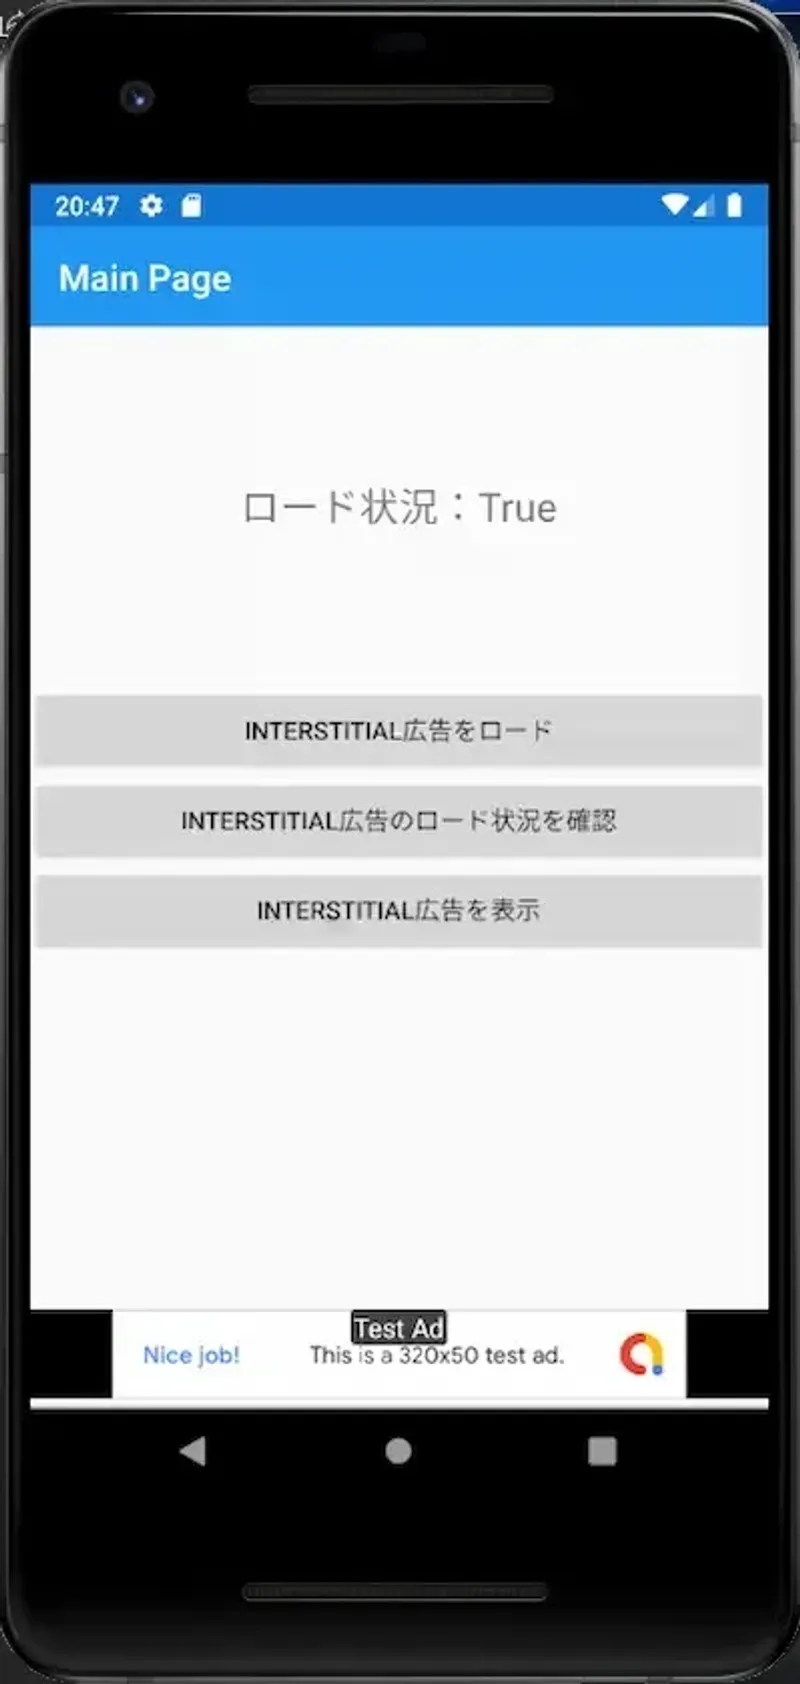
Interstitial広告が表示される

まとめ
今回作成したサンプルプロジェクトは一応github.comに置いているのでご参考まで。
neputa/AdmobTest: MarcTron.Admob を使用したAdMob広告の表示テスト
MarcTron.Admob を使用したAdMob広告の表示テスト. Contribute to neputa/AdmobTest development by creating an account on GitHub.
また、今回紹介していないMarcTron.Admobの機能については、公式のサンプルを参照されたし。
また質問や間違いなどあればコメントまたはTwitterにいただけるとうれしい。